
A toddler crochet vest pattern that is perfect for beginner crocheters, plus it has a boho fringe.
How many times do you see a cute top and think “I could make that”? You shop for yarn only to realize it would have been cheaper to buy the top. I know the quality of handmade and the feeling of accomplishment doesn’t have a price, but it’s still a little disheartening.

This all started by dreaming of the lake, warm sunshine, and a strawberry margarita. A swimsuit cover-up was the plan. After crocheting a swatch, the stitch pattern was better suited for a vest. The airy boho feel is created by alternating half double crochets and chains. I love everything boho; crop tops, flower crowns, and anything with fringe.
What Most Crocheters Hate
Seaming pieces together and sewing in ends is the worst part of crocheting. I wanted to make the boho vest all in 1 piece. The only seams to sew together are the shoulders.
If you are a beginner to crochet, a vest is the perfect 1st garment to try. Clothing is intimidating. I waited years before I took the plunge. I didn’t want to waste all that time and yarn only to have a lopsided cardigan taking up space in my closet. So I made one for my daughter. Here are a few more toddler crochet patterns. Surprisingly, it turned out. Don’t let fear hold you back.
If little sister needs a matching boho chic vest you can get the Boho Baby Vest Pattern too.
Ready to try your first crochet toddler sweater pattern? The Bell Crop Sweater explains every detail to make your first a success.
What You Need To Crochet The Boho Vest
Gauge:
11 sts= 4”
Finished Size:
Toddler 2T-5T 12”x12” without the fringe
Abbreviations (U.S. crochet terminology used)
hdc= half double crochet
hdc2tog= half double crochet 2 stitches together
sl st = slip stitch
YO = yarn over
sc = single crochet ch= chain
sts= stitches
Toddler Boho Vest Crochet Pattern
ch 69
row 1: sc in 2nd ch from hook, sc in each ch across. Turn (68sts)
row 2: ch 2(counts as 1 hdc) skip 1st stitch, 1 hdc in next st, *ch 1, skip 1 st, 1 hdc in next st. repeat from * across. Turn (68sts)
row 3: ch 2(counts as 1 hdc) *1 hdc in the ch space, ch 1, skip 1 st, repeat from * across. You will end with a hdc in the turning ch space. Turn (68sts)
row 4: ch 1, hdc in each st across. The last hdc will be in the turning ch. Turn (68sts)
row 5 & 6: repeat row 4
rows 7-11: repeat rows 2-6
1st Front Vest Panel
row 12: ch 1, 1 hdc in each of the next 18 sts. Turn (18sts)
row 13: ch 2(counts as 1 hdc) skip 1st stitch, 1 hdc in next st, *ch 1, skip 1
st, 1 hdc in next st. repeat from * across. Turn (18sts)
row 14: ch 2(counts as 1 hdc) *1 hdc in the ch space, ch 1, skip 1 st, repeat from * across. You will end with a hdc in the turning ch space. Turn (18sts)
row 15: ch 1, 1 hdc in each st across. The last hdc will be in the turning ch. Turn. (18sts)
row 16: ch 1, hdc2tog, 1 hdc in each of the next 14 sts, hdc2tog. Turn (16sts)
row 17: repeat row 15 (16sts)
row 18: repeat row 13 (16sts)
row 19: repeat row 14 (16sts)
row 20: repeat row 15 (16sts)
row 21: ch 1, hdc2tog, 1 hdc in each of the next 12 sts, hdc2tog. Turn (14sts) row 22: repeat row 15 (14sts)
row 23: repeat row 13 (14sts)
row 24: repeat row 14 (14sts)
2nd Front Panel
Attach the yarn in the last stitch on the opposite side and repeat rows 12-24.
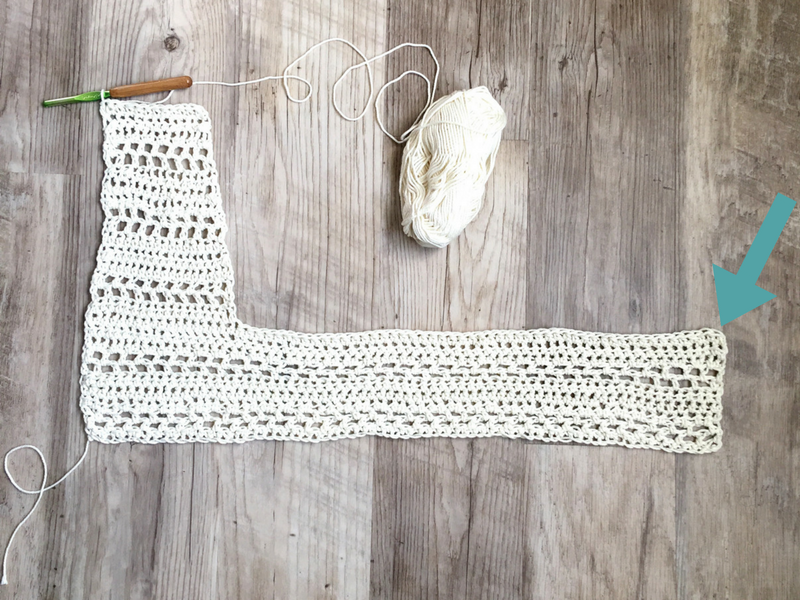
Back Panel
Attach the yarn in the next unworked stitch where the arrow is pointing.

row 1: ch 1, 1 hdc in each of the next 32 sts. Turn (32sts)
row 2: ch 2(counts as 1 hdc) skip 1st stitch, 1 hdc in next st, *ch 1, skip 1 st, 1 hdc in next st. repeat from * across. Turn (32sts)
row 3: ch 2(counts as 1 hdc)*1 hdc in the ch space, ch 1, skip 1 st, repeat from * across. You will end with a hdc in the turning ch space. Turn (32sts)
row 4: ch 1, 1 hdc in each st across. The last hdc will be in the turning ch. Turn. (32sts)
row 5: ch 1, hdc2tog, 1 hdc in each of the next 28 sts, hdc2tog. Turn (30sts)
row 6: repeat row 4 (30sts)
row 7: repeat row 2 (30sts)
row 8: repeat row 3 (30sts)
row 9: repeat row 4 (30sts)
row 10: ch 1, hdc2tog, 1 hdc in each of the next 26 sts, hdc2tog. Turn (28sts)
row 11: repeat row 4 (28sts)
row 12: repeat row 2 (28sts)
row 13: repeat row 3 (28sts)

Sewing It All Together
(If you are blocking do this before sewing together)
1. Lay the vest out flat.
2. Fold each panel in.

3. Sew together along the top, following the dotted line, to form the shoulders of the vest using the whip stitch.

Fringe
Cut yarn into 4” pieces. Hold 2 strands of yarn together, fold yarn in half, tie a larks head knot. Repeat this along the bottom of the vest.

You just finished a cool boho vest using only 1 skein of yarn. That means you have enough money left for that strawberry margarita! You’ll also love this toddler crop top crochet pattern. It’s easy as pie and designed to be worn over summer dresses.

I would love this pattern . I have a beautiful 4ply fine merino wool . Would this work?
ps I just finish your pattern for the raffia round bag!! Love it thanks
Hello
Is the hook size in American terms as a 6.5 hook in the U.K. is rather big. The yarn that I bought suggests a 4 hook (uk) so not sure whether I’ve got it wrong maybe? Thanks
The 6.5 is referring to the mm measurement of the hook. The US hook size is K10.5/6.50mm. I hope this helps!
Could I have a copy of the pattern? Haven’t received an email yet! Cant wait to make this cute vest for my girls! 🙂
Hi Tara! When you click the pink button above that says “Get the free PDF crochet pattern” you can enter your email and a link for the pattern will be sent to you. Check your spam folder, You’ll have to confirm the email address!
I can’t wait to see your finished vest. I’m sure your girls will love it!
Sierra
Hi Sierra!!
I am so on love with this pattern. I’m attempting to make it but I’m finding my stitches are off. I’ve redone it several times now but always find my stitch count to be one off from 68 when I hit row 2 and 3. Any idea what I may be doing wrong? Lol
Thanks in advance for your help. And for this gorgeous pattern ?
Hi Angela!
I’m so happy to hear you love the pattern! The beginning chain of rounds 2 and 3 counts as 1 stitch. That might be where your counting is off.
As long as you are ending with a hdc in the last stitch of row 2 and the turning ch of row 3 you’re vest should still be straight.
I hope this helps!
Sierra
I love this vest. Could you send me the pattern too. Thank you.
Please email me the pattern. Nothing has come through. [email protected]
I sent you an email Alyssa.
Please email me the pattern
Hello. This is a very nice vest. Can I have the pattern sent to my email ? Thanks.
I would love to receive this pattern on my email.
Hi This is a gorgeous vest request pattern but nothing come through
Can you please email directly to me as well? I have entered my email address but nothing is returned.
Hi Jennifer!
I just sent you an email with a few more details.
Could you make this pattern for adults to just make it bigger? Or have you tried it because i have been looking for one!
Thanks
Hello Brooke,
I haven’t tried making this vest for adults. I don’t see why you couldn’t. It would be super cute!
Hi, This is the coolest lil vest ever!!! I have entered my email address 3 or 4 times and I get the message that the pattern is on the way but I still haven’t received it. The first time I entered it was last night.
Can you help?
Thank you,
CP
Hi Cindy! I just sent you an email that should help. Enjoy the pattern!
This is a test for me.
Are final measurements available with the pattern?
Hello Ivonne,
Yes, the measurements of the vest are included in the PDF pattern.
If you have any other questions let me know!
Stay Cozy,
Sierra
Great pattern